INTERNAL DIGITAL BANKING HELP
Please do not share with membership
Here are some commonly asked questions about digital banking. For further assistance, contact the digital team.
NOTE: Click Control - F to search the page. (Command - F for Mac)
General FAQs
We are aware of the following issues and are actively working to address them.
ACTIVE, TOP PRIORITY:
Businesses with 360 view may not be able to transfer from business to personal account
Sub-Users receiving "Undefined" error on contact screen
We are working to turn off this prompt to unblock sub-users from app access while this bug is being addressed in the meantime
Stop Payment submission errors - expect to be resolved shortly
Transactions are not categorized and-or can't be categorized
INTERMITTENT - please report MemberID and timestamp if encountered
MFA not sending
Temporary password errors
'Remember this Device' not remembering
RESOLVED:
360 view for business members in the personal login
Card Controls are back on
Available Credit is displaying for credit cards and line of credit
Share and Loan ID finding instructions updated
Remote deposit not working on iPad
Remote deposit error when opening widget
Plaid connectivity - However, if member has their MFA set to default to an authentication app connection will fail.
Remote deposit limit indication is daily instead of monthly
Remote deposit limits for business members defaulting to retail ($25k monthly)
Supported browsers for desktop and mobile web access - Google Chrome: Latest 2 versions- Firefox: Latest 2 versions- Microsoft Edge: Latest 2 versions- Safari: Last 2 major versions or 1 major version if over 1 year old- Chrome for Android: Supports the current device OS browser- Mobile Safari for IOS: Supports the current device OS browser
Supported mobile device operating systems- Android: v9.0 and above- IOS: Current and last two major versions
Members can update their mobile devices to the latest operating system by following these steps:
Apple users: 1. Go to ‘Settings’ 2. Tap ‘General 3. Tap ‘Software Updates’ 4. If a new update is available, you’ll be prompted to install the update Android users: 1. Open ‘Settings’ 2. Select ‘About Phone’ 3. Tap ‘Check for updates’ 4. If an update is available, you will be prompted to install the update.
Business and retail members will now use the same mobile app for Elevations Digital Banking.
Business members will need to delete the former app and re-install the new app. The app should auto-update for consumer members but they can also proactively update it from the app store if not.
NOTE: the Biometric features will not work for multiple logins. Members will need to manually enter their username and password for each login or use the 'Remember me' feature.
Members must have the right type of ownership on a membership to qualify for digital banking access and account visibility.
Eligible name types for digital banking access and account visibility include: - Primary - Joint - Co-Borrower - Responsible Individual - Trustee - Custodian - Representative Payee
NOTE: Elevations corporate cardholders will no longer have digital banking access for their card transactions and statements. They will use the statement archive on The Peak to download transaction information.
Login and Conversion
Retail members: information entered is being matched to the Primary name record of the membership
Other owners on the account i.e. Joints can self-enroll for their own digital banking login at elevationscu.com/login or through the mobile app
Complex accounts (Trust, Estate, Memorial, Custodial): information entered is being matched to a pre-designated name type (Trustee, Custodian, Responsible Individual)
The verify identity screen is looking for that individual's SSN and DOB, not the EIN for the Trust, Estate, etc.
The Personal Info section in the member profile in Admin will indicate which DOB and SSN the Verify Identity screen is expecting to be entered
Other eligible name types can self-enroll for their own digital banking login at elevationscu.com/login or through the mobile app
Please note:
SSN and TaxID should be entered without any formatting; numbers only
Date of Birth must be entered with backslash formatting i.e. MM/DD/YYYY
If a member encounters an error message when entering a temporary password provided via the password reset flow, or is sent back to the Verify Identity screen, they should close out of that session go back to elevationscu.com/login and try re-entering current username and temporary password. If that does not work, they should clear cache and cookies and try again.
Search for the user in Admin, if the Episys account isn't found the member will need to self-enroll.
If they forgot their username or password they can self-service resets using the appropriate links on the desktop and in the mobile app.
After 5 unsuccessful login or verify identity attempts a member will be locked out
The lockout period is 24 hours from the last attempt
If the member's status still shows "Active" in Admin, staff will only be able to perform a password reset to assist before the time period is elapsed
Temporary passwords are valid for 24 hours
To update the contact for verified members:
Email can be updated in the member's profile in Admin
Phones will have to be updated on Episys and will take approximately 10-minutes to sync to the platform
For MFA via text:
Visit Settings > Security and check or do the following:
Scroll down to Two-Factor Authentication
Toggle “On” Code Via SMS
They may need to add a Mobile phone in Settings > Contact to turn this on
Click the pencil icon
Check the box next to “Set as Preferred Authentication Method”
For alerts via text:
Visit Settings > Contact and check or do the following:
Verify, enter, or update Mobile phone number
Check "I would like to receive SMS text messages to this number"
Click "Send a code via text" button
Enter code, click "Verify" - a 2nd code will then be sent
Enter 2nd code, click "Confirm Code"
Check "Set as Preferred contact phone"
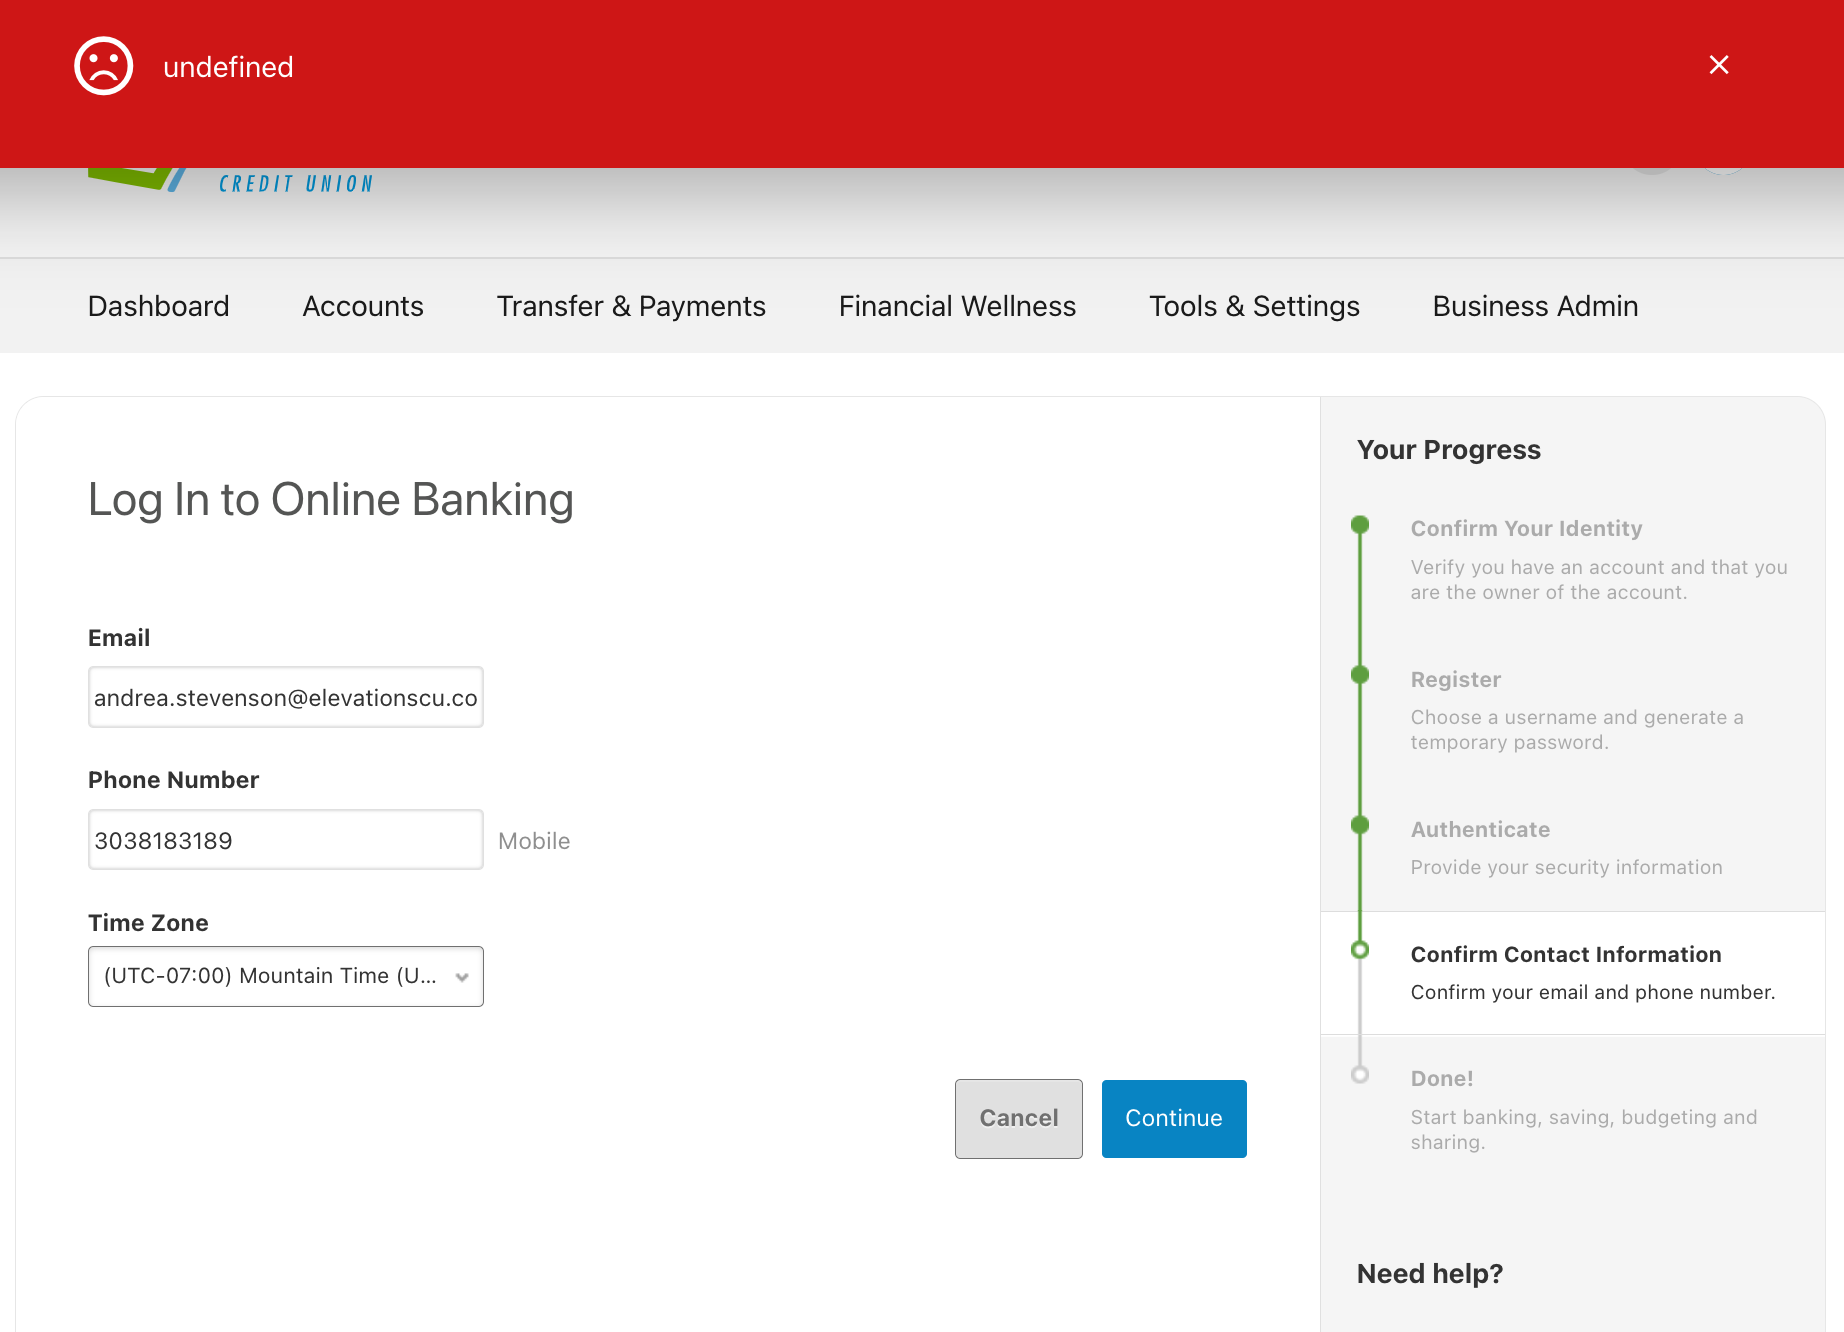
If a member receives an "Undefined" error when clicking "Continue" on the contact confirmation screen, they can bypass the issue by clicking the navigation in desktop. User's receiving this error in the mobile app will be unable to proceed and will have to use mobile web browser as a workaround.
If they click "Cancel" they will be logged out of digital banking and have to log back in.
If a member is experiencing a 500 error when trying to log in from multiple devices and locations, our vendor will need to rebuild the member's authentication profile.
Contact the Digital Product Team and provide the following information:
MemberID
Username
IP Address
After the profile is rebuilt, the member's password will need to be reset in Admin.
This issue is most commonly encountered when a member has a VPN turned on. Advising them to turn it off typically resolves the error.
Dashboard and Account Details
Retail members will have a default 360 view of all of their retail memberships from any login
If a retail member wants to intentionally separate their linked view they can:
Hide the accounts they do not wish to see in the login in Settings > Accounts
Put in a request with Account Services to permanently remove the linkage
This requires the removal of a preference access 2 record and the addition of a warning code 76 to prevent the link from being re-created
Business and Complex 360 views will be provided by request only.
Business 360 - submit a service event to Business Services
Members with business and personal links will only be able to see the 360 view from the personal login
Business credit card loans and cards will not be visible in the 360 view
Complex 360 - submit a service event to Account Services
Warning code 23:
If an account has been flagged for fraudulent activity, the 360 view will automatically break
When the warning code is removed by Fraud:
Retail accounts 360 views will be automatically restored in 2 business days
Complex and Business accounts 360 views will need to restored by request
When support members who believe they are not seeing all of their accounts on their dashboard, or are encountering errors transferring across multiple Episys accounts, please review the following. Also be sure to refer to this job aid for how to guide members on linking options(opens in a new window).
Linking is established
Preference access 2 record is on each Episys account being linked
None of the following warning codes are present on either Episys account
23 = Fraud
76 = No Programmatic Linking or Unlinking
There are no charged-off products on any of the Episys accounts
There are no delinquent loans on any of the Episys accounts (HB Mode = 0)
Linking is viewable
Check the Accounts tab in the member profile:
If linked accounts are not showing:
Verify the SSN of the individual logging in is correct and in sync across:
All associated name types on Episys
Member profile in Admin
If linked accounts are showing:
Use View As User and check if any accounts are set to hidden in Settings > Accounts
Check that members with personal and business links are logging in to the personal login
Reminder, business credit card loans and cards won't be visible in the 360 view
Transferring is possible
Preference access 3 record is on each Episys account holding the products the member wishes to user from transfers from
If linking and/or transferring is not established as explained above, please submit a Service Event to:
Account Services - for Retail and Complex Accounts
Business Services - for Business Accounts
Moving from an account centric to user centric login model means we can provide members with a filtered view of just the products they have ownership on (where their SSN or TIN is present on an eligible name type)
In the previous platform this ownership validation was not possible, so some members may be used to seeing more than they will in the new platform
If a member feels they should still have visibility to these products, there are 2 ways we can assist them:
The Primary can provide Shared Access (see Shared Access FAQ for steps)
The impacted member can work with the Primary to get them added to the missing products as an eligible name type in Episys.
Steps for a member to share account access with another individual:
Log in to digital banking
Go to Settings and click Shared Access
Click the “+ Add a user” button
Enter the invited user’s information in the fields provided
Define product access and permissions for that user
Click “Save”
Accept the terms & conditions and click “Confirm”
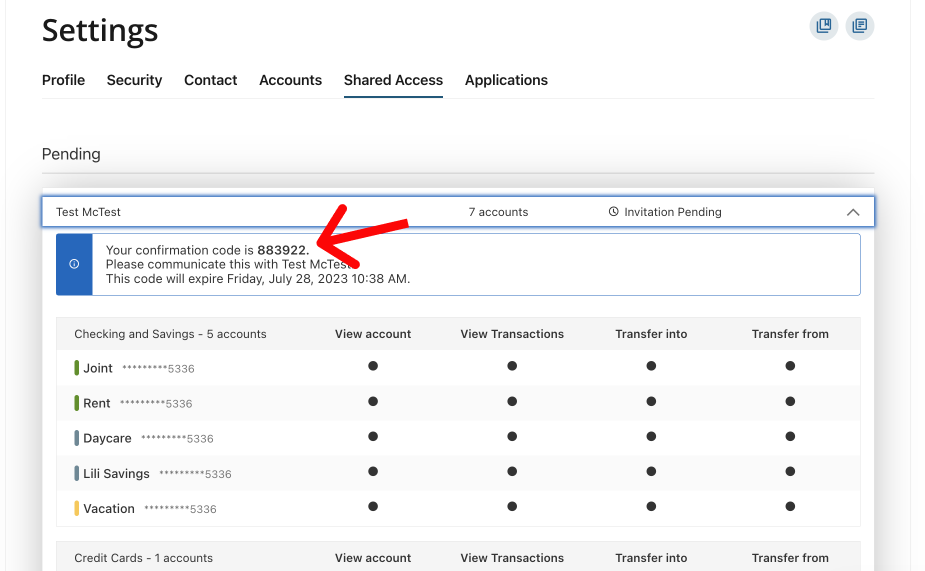
Click the invited user’s name under ‘Pending’
Provide the invited user with the confirmation code listed in the blue box
The invited user will receive an email with links to accept their shared access and will be prompted for this confirmation code to complete the access
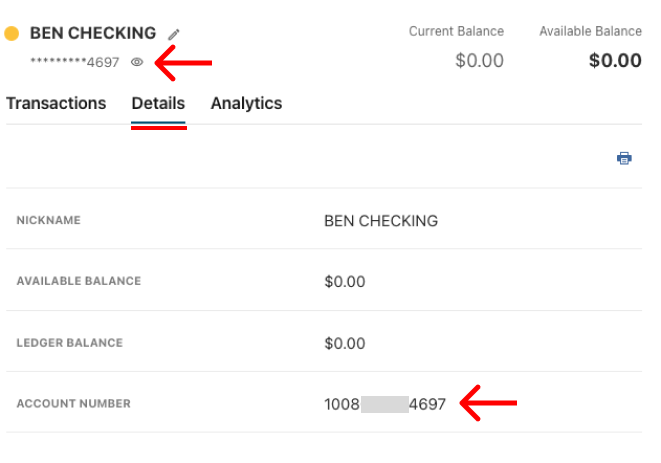
In the new platform the member is seeing the last 4 digits of their MICR vs the old platforms where they saw the suffix
Example: - Old platform: 0008 - New platform: *****1234 When the member clicks into the account, there is an eyeball icon that allows them to display, and then copy, this full account MICR. Or they can see it in the details tab.
Nicknames are now capped at 16-characters; those that could convert were automatically truncated.
Nicknames for retail users that were added or updated in the last 6 months did not sync to the new platform and must be re-established.
Nicknames for business users were unable to convert and must be re-established
Nicknames can be defined by clicking the pencil icon after clicking into an account from the dashboard, as well as in Settings > Accounts
Nicknames that members created in digital banking can be referred to by staff in Episys under the IQ Tree.
Each owner can have their own unique nickname for a particular product; a Joint's nickname will not overwrite what the Primary sees and vice-versa.
The nickname field on Core will only reflect the last updated nickname so there could be inconsistencies when referring to this field depending on which member you are supporting.
Current Balance for loans = the amount currently owed on that loan
Current Balance for shares = amount in the account without pending transactions, check holds, or any other type of funds holds applied
Available Balance for shares = balance less pending funds and holds; the amount the member has to spend right now
Available Balance for credit cards = amount of remaining available credit
Due to constraints on the statement vendor side, the following conditions must be met in order for a member to access statements:
Member must be the Primary name type on the account
Member must be logged in to that account; they cannot see statements through 360 linking
Example: - John Doe is Primary on Episys account 123 and 456 - John can see statements for 123 from his login to account 123 - John can see statements for 456 from his login to account 456 - John cannot see statements for account 456 from the login to 123 and vice-versa - John’s wife Jane who is a Joint cannot see statements for either 123 or 456
Statement access from Android may not work; those users will only be able to access statements from desktop.
Members will be able to see ECU checks that have been cashed at other financial institutions.
Members are currently unable to see checks deposited at ECU from other financial institutions.
Mortgage
If a borrower’s only relationship to the Episys account where the mortgage is held is on the mortgage itself, they will not be able to sign up for digital banking access or see the mortgage loan on their dashboard. For borrowers who do not qualify for digital banking access, the primary borrower on the loan can provide Shared Access. Shared Access will provide access to the mortgage service center and it can be provided to anyone, not just borrowers. (see Shared Access FAQ for steps)
The only way to access the Mortgage Service Center is through digital banking. Borrowers can self-enroll through elevationscu.com/login or through the mobile app. For borrowers who do not qualify for digital banking access, the primary borrower on the loan can provide Shared Access. (see Shared Access FAQ for steps)
Payments previously set up in the Mortgage Service Center will continue to process without interruption. To set up payments from external accounts and manage payments previously set up in the Mortgage Service Center, the member can click Accounts > Mortgage Service Center. Members also have the option to set up payments for their monthly amount due from Elevations accounts to their mortgage directly in digital banking. Recurring payments will automatically adjust as the monthly due fluctuates.
The Mortgage Service Center has received an upgrade! The new platform is now fully mobile optimized and offers enhanced features such as robust calculators and pay-down analysis tools, a more intuitive user interface, as well as additional principal payment options. Previously scheduled or recurring payments should not have been impacted by this upgrade.
Transfers
If a member does not see an Elevations account in their "To Account" drop-down, they can add it.
To add a member transfer recipient:
Go to Transfers & Payments
Click on the Add Accounts tab, then click the Add Account button
Click “Send money to another Elevations member”
Enter the name on the account
Select ‘Account’ under the verification method and enter remaining information
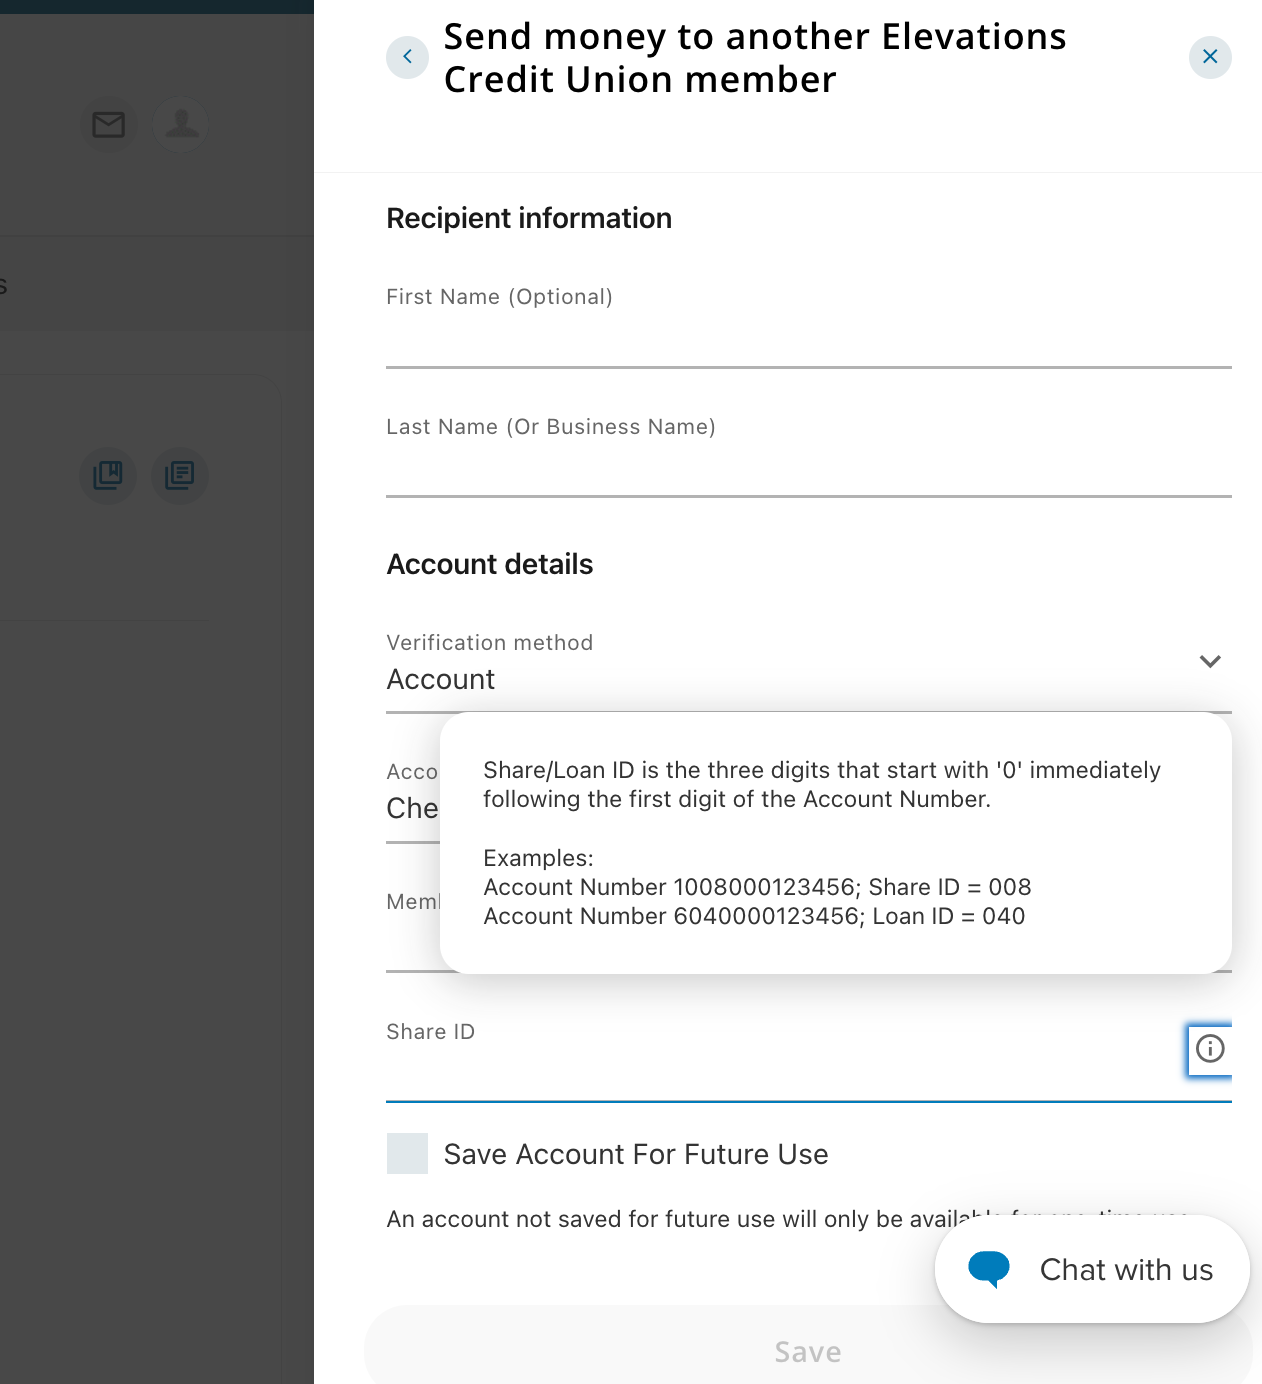
Note: on the Share or Loan ID field there is an info icon that will guide the member on how to find this number
A preference access 3 record is required to allow transfers between linked Episys accounts and member-to-member accounts. If a member is encountering an error check Episys to see if that PA3 is present on the Episys account the funds are being transferred from.
To add an external account
Go to Transfers & Payments
Click on the Add Accounts tab, then click the Add Account button
Add an external account instantly using the login credentials at the external FI or add an account manually and verify with microdeposits
Microdeposits take 2-3 days to process
To establish external transfers:
Go to Transfers & Payments
Select desired transfer From / To transfer combination
Select desired frequency
NOTE: Transfers that were set up previously were converted to the Primary owner's login. Before re-establishing any transfers (internal or external) members should also check with co-owners on their account to make sure transfers aren't already set up in their logins.
Our vendor, Yodlee, determines which external FIs are supported for instant external account linking
Currently, the following big banks are not supported:
Bank of America
Capital One
Charles Schwab
Chase
Citibank
Navy Federal
USAA
Wells Fargo
Canvas
Additionally, regional and smaller banks may not be supported
Members can add accounts from these institutions manually, using microdeposits The manual account verification process takes 2-3 days.
The new platform only supports "Semi-monthly" frequency which defaults to transfers occurring on the 1st and 15th of each month.
If a member had "Twice a month" set up in the old platform with any other date combination, those became 2 single monthly transfer series in the new platform.
Transfers between credit products are no longer supported. Members will need to transfer from the credit card or line of credit to a share and then to the line of credit or credit card.
Transfers out of HSA Checking accounts are not supported in the new platform.
If the recipient is an Elevations member:
Go to Transfers & Payments
Click “Add Account”
Select “Send money to another Elevations Credit Union member”
Follow the prompts to add account to the "To Account" dropdown in the transfers screen
Transfers to other Elevations members will be immediate and there are no transaction limits. If the receiving individual is not an Elevations member:
Click Transfers & Payments > Bill Pay
Click “+ Add Payee” button
Select “Person”
Select the Payee’s delivery option:
Check will mail a physical check to that individual and take 5-7 business days to process
Electronic requires the member to enter the recipient’s account information and will take 1-2 business days to process
SMS and Email will send a payment notification to the recipient and a link to enter their account information, payments will then be sent electronically
Complete the one-time passcode MFA process
Click the “Go to Payee” button
Enter Pay From Account, Amount, Frequency and Date
Click “Submit Payment”
Bill pay payments are subject to daily limits (see Bill Pay Limits FAQ) and will take anywhere from 1-7 business days to process
For recurring transfers / payments set up to always pay the minimum amount due or statement balance, the amount will update when the statement is available. There may be some amount of time in between when the payment is made and when the next statement becomes available. In that interim, there will be a scheduled transfer that displays the transfer amount from the previous statement. Once the statement becomes available, the amount of this scheduled transfer will update.
Bill Pay
Retail members and small businesses can send up to the following amounts using bill pay: - $10,000 per transaction - $20,000 daily - $100,000 monthly
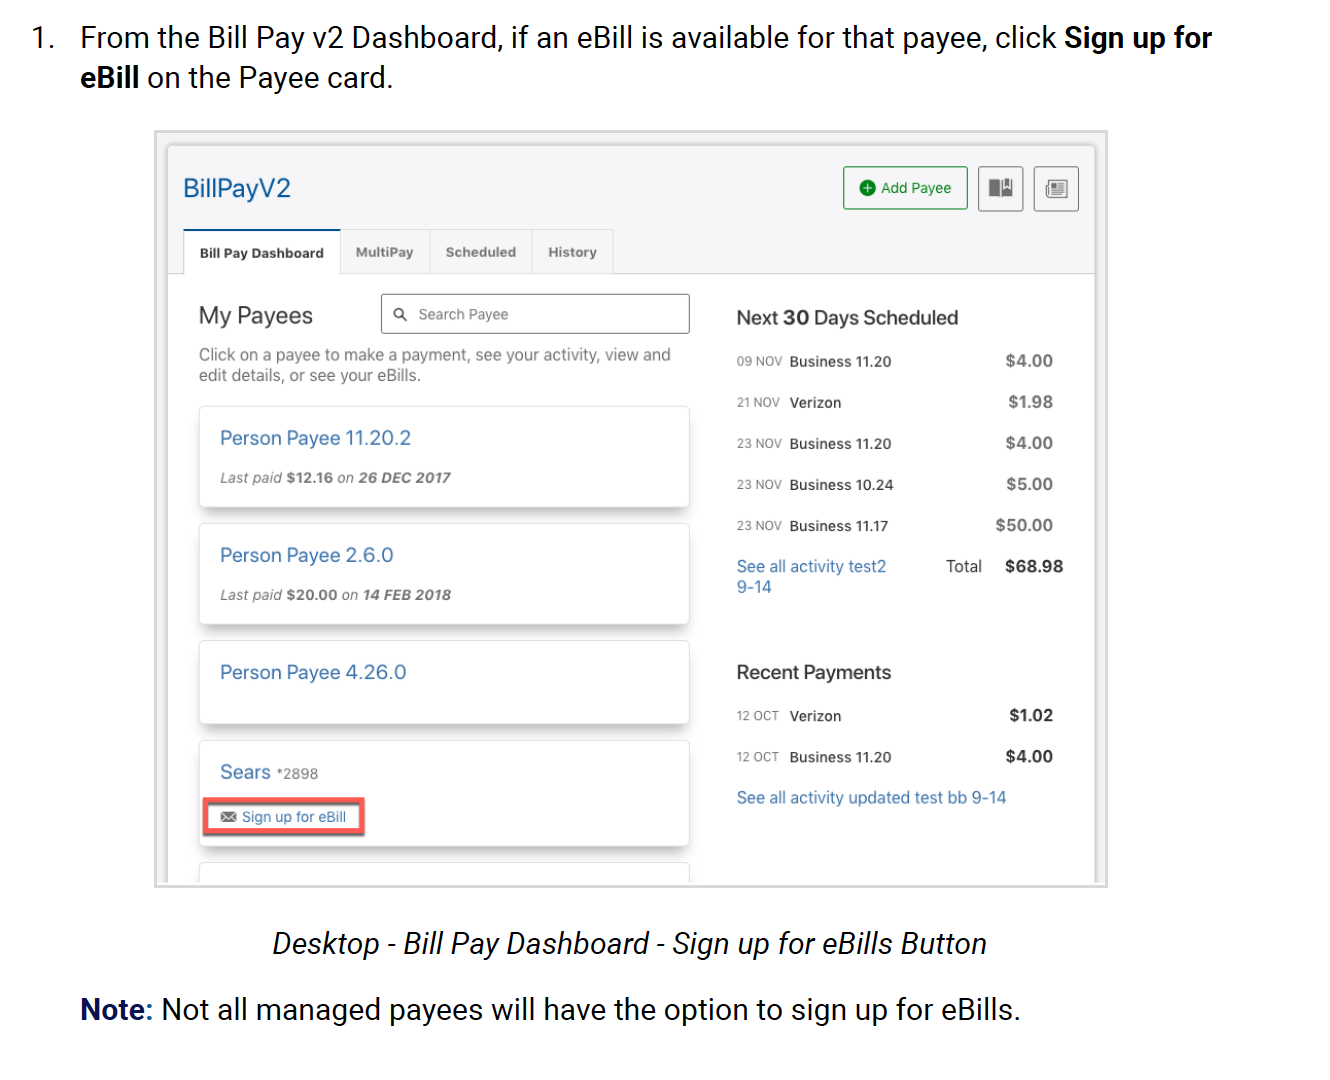
If a Payee qualifies for eBills in the new platform, there will be a "Sign up for eBills" link below the payee name.
To set up eBills for a qualifying payee:
Click "Sign up for eBills" link under payee name
Click the Setup eBills button on the eBills tab of the payee details
On the "Begin eBill Enrollment" enter login credentials to instantly verify the member's account with the payee
When registration an "eBill Available" link will show under the payee name
Some Payees that were set up for electronic payments in the old bill pay platform, are only able to receive check payments in the new platform
Processing times for electronic payments is 1-2 days.
Processing times for check payments is 5-7 days.
List of impacted payees can be found on the "Payee to Check" tabs of this document(opens in a new window).
If a recurring bill pay payment falls on a weekend or holiday it will process on the business day prior.
The add icon (plus sign) appears in the lower right corner on the Add Payee screen in mobile. The default position for our chat bubble is also in the lower right corner of the mobile app. The user can click and drag the bubble to the left corner to uncover the add button.
Bill pay history did not convert to the new platform for retail members. Staff can access bill pay history in FIS for the next 30 days. The Digital team also has a data file of history that can be provided as needed.
History for business member's should have converted and be visible to the member.
In order to use the bill pay service, a member has to have a valid domestic mailing address in Episys.
eBills
Commercial Bill Pay access (for businesses assigned to the medium package)
The most common reason for a generic bill pay error is the member is trying to process a transaction that exceeds the $10,000 transaction or $20,000 daily limits. We are working to get this message updated to be more specific when that is the case.
Remote Deposit Capture
Retail members can deposit up to the following amounts using mobile deposit:- $15,000 per rolling 30-days
Business members can deposit up to the following amounts using mobile deposit:- $25,000 daily- $150,000 per rolling 30-days
NOTE: we are currently experiencing issues with business member limits being recognized and applied. We have temporarily moved the default limits to $25,000 for all members and are continuing to troubleshoot the business limit reading issue.
Check depositing from the desktop is no longer supported for retail members. Members can deposit checks in the mobile app. Members can deposit up to $15,000 in a rolling-30 day period. Example: - Day 1: Member deposits $10,000 - Day 2: Member deposits $5,000 - Days 3-30: Member is unable to make any new deposits - Day 31: Member can deposit up to $10,000 - Day 32: Member can deposit up to $15,000 (assuming no deposits were made on Day 31)
The member is likely on an older operating system or device. Best advice would be to try an operating system upgrade to resolve the issue.
Card Management
To establish card alerts
Go to Card Management > Alerts, Travel Notices, Replace
Click the “Manage Card” button on the card you wish to set alerts for
Click on “Alerts and Controls”
Click on “Manage Card Alerts” and set desired alerts
Members will only be able to see and manage cards in their own names due to the user-centric nature of our new platform. If they require assistance managing other cards on their loan, they will need to chat or call us.
Business members will not have access to most card management features.
To view card rewards, business members will need to register on the card rewards site and set up a separate login to access it.
To register for card rewards access:
From digital banking, click Tools & Services > Card Rewards (or visit https://rewards.elevationscu.com(opens in a new window))
In the upper right corner click "Register" and complete the enrollment process
Members can also contact our Card Rewards vendor for assistance at 844-232-8793
Due to constraints on the rewards vendor side, members cannot see or access card rewards through 360 view. They must be logged in to the account that holds the rewards loan.
Example:- Bill Smith has logins for accounts 123 and 456- Bill Smith has a rewards loan on account 123, he does not have a rewards loan on 456- Bill Smith will see rewards points and be able to redeem them when he is logged in to account 123- Bill Smith will not see his rewards points nor redeem them from account 456
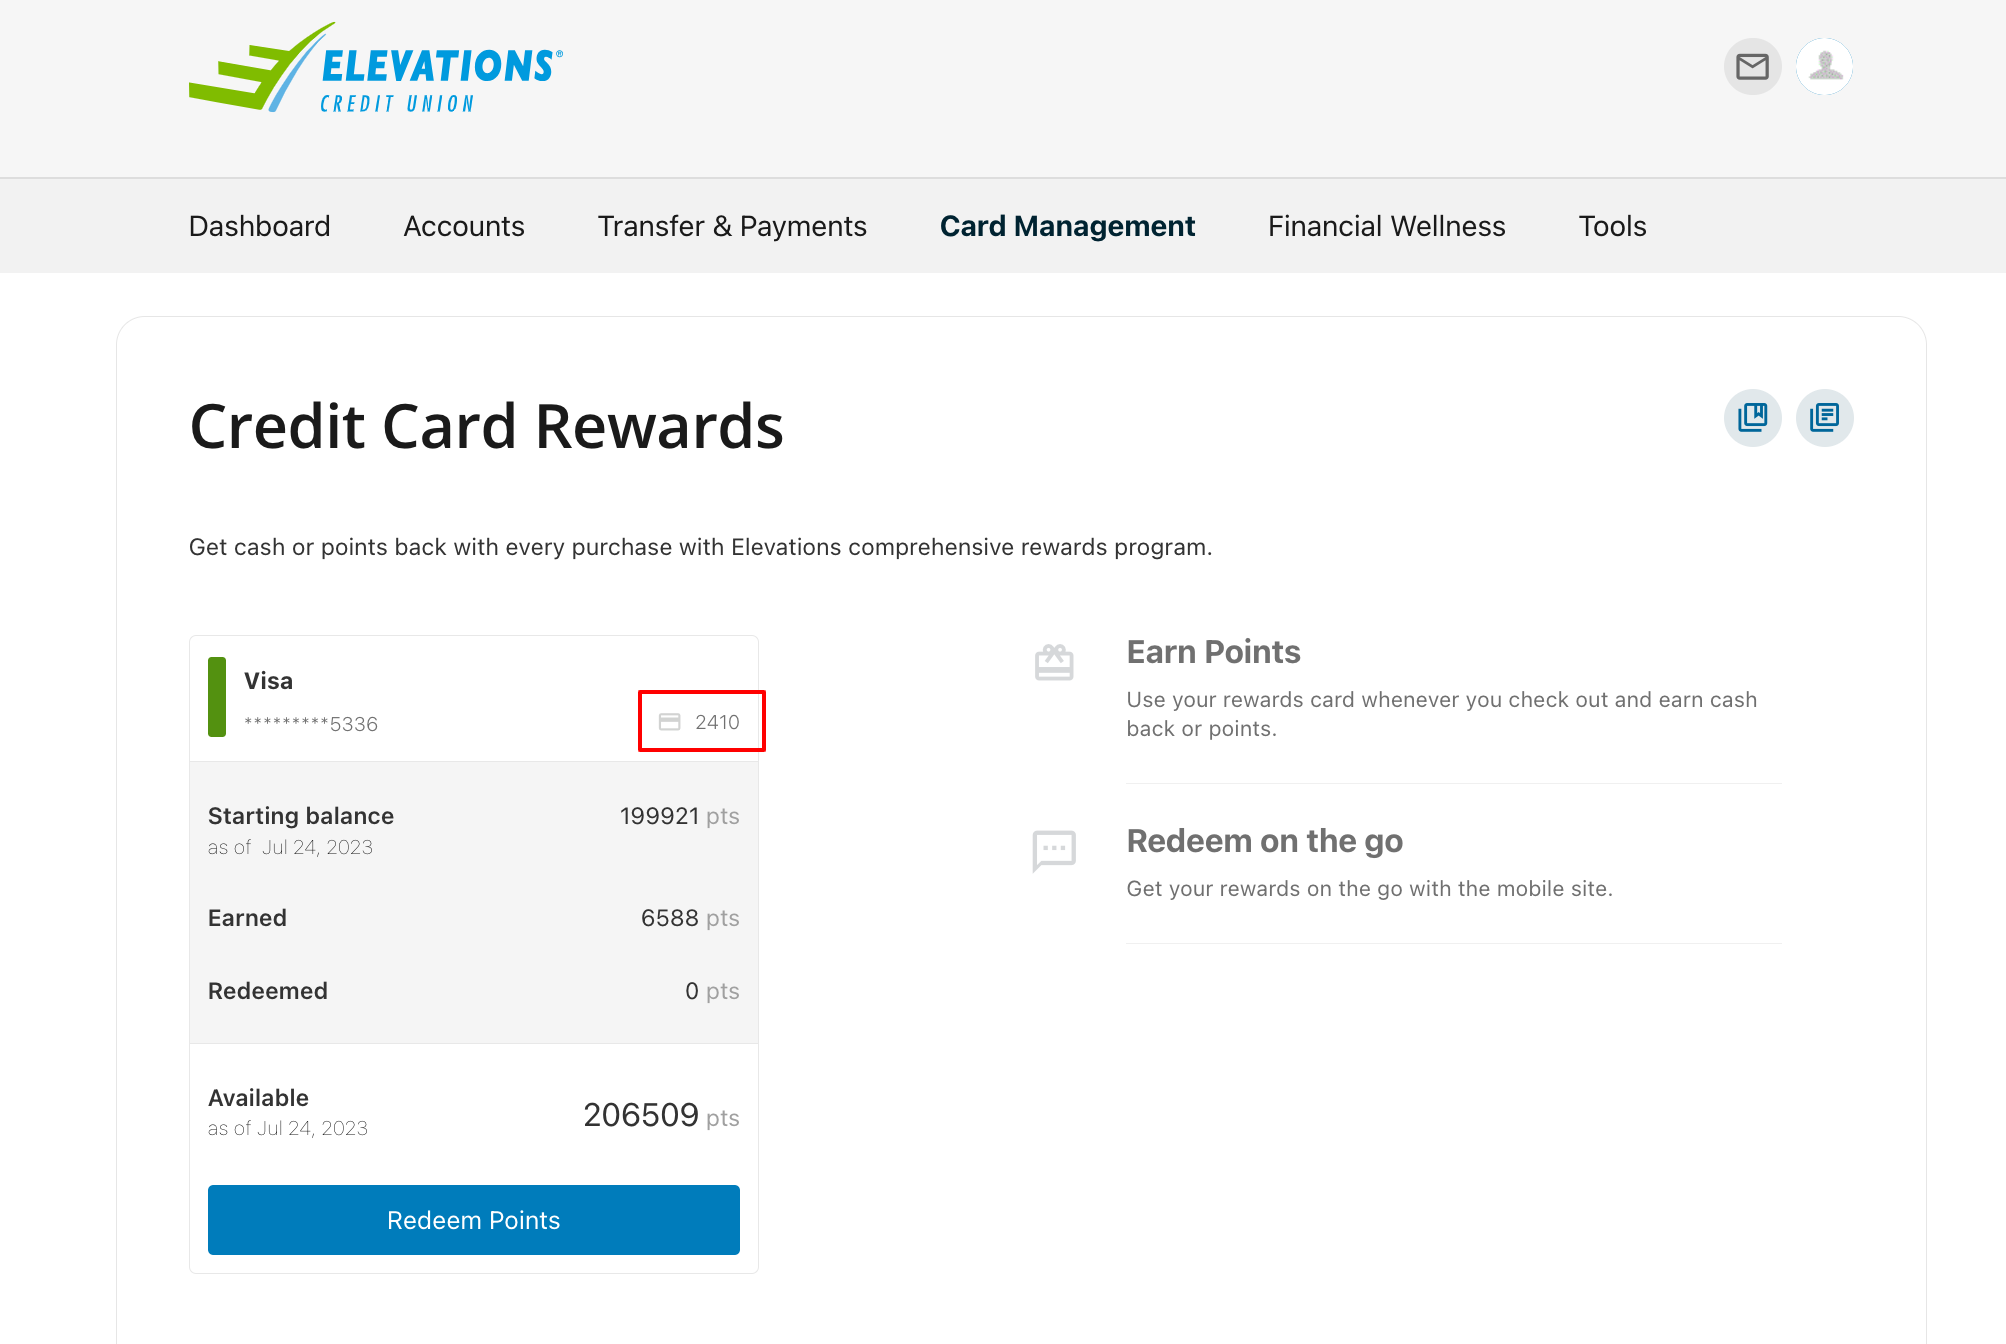
For some members, the last 4-digits that display in the card rewards widget may be pulling from another card number on the loan. The points and the link to redeem should be accurate as these are based on the aggregate of the loan's rewards activity.
Travel notifications set up by staff won't be visible to the member in digital banking.
Best practice is to guide the member on how to self-service setting up travel notifications themselves so they can then manage as needed.
To set up travel notifications:
Click Card Management > Alerts, Travel Notices, Replace
Click on the card that will be used while traveling
Click "Travel Notifications" and enter start & end dates and destination
Note: notices are not needed for domestic destination
Click the Save button
Alerts and Settings
To set up new or edit balance and transaction alerts:
Verify, enter, or update email or mobile phone in Settings > Contact
To enable alerts by text:
Click on the phone field
Check “I would like to receive SMS text messages to this number”
Click “Send a code via text” button
Enter the code from the text message and click “Verify” - a 2nd code will be sent
Enter 2nd code from the text message, click “Confirm Code”
Click “Set as preferred contact phone”
Go to Tools > Alerts
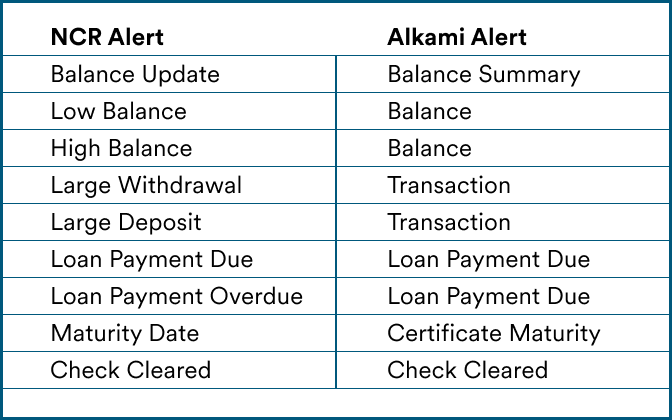
Set desired alerts - mapping from the former retail platform to current platform can be found below
NOTE: text banking is no longer supported
Financial Wellness
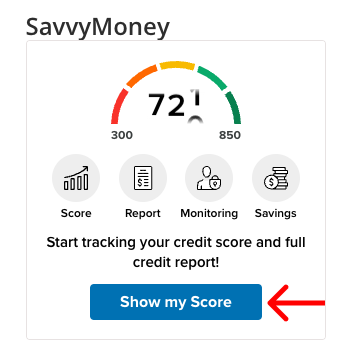
The member will need to enroll in SavvyMoney to enable the free credit score monitoring service. The score will automatically update every 7 days and the member can manually refresh their score every 24 hours. Members can click the SavvyMoney widget from the dashboard in desktop or mobile app to accept the T&Cs.
SavvyMoney uses a ‘soft inquiry’ so credit scores are not affected by this enrollment (a loan application would use a ‘hard inquiry’ pull which does affect a credit score.
More information on SavvyMoney can be found at:
SavvyMoney uses the TransUnion credit bureau and VantageScore 3.0 scoring model for credit score monitoring.
If the member feels their credit score is wrong, they can file a dispute directly with TransUnion using the ‘Start A Dispute’ button at the bottom of the Credit Report page.
Members are encouraged to still use SavvyMoney if their profile is blocked or frozen so they can monitor and report any concerns quickly
If the member wants to apply for the loan, they must remove the block or freeze before submitting the application
Members will need to de-activate and re-activate Intuit services if they have not done so already. Members are advised to complete a data file backup and a final transaction download prior to doing so. Please visit this page(opens in a new window) for instructions members can use to complete those actions
Direct Connect is no longer supported, the connection types that are supported in the new platform are:
Web Connect - QuickBooks, Quicken
Express Web Connect (aggregation) - Quicken, QuickBooks Online, Mint
There are 3 locations to link or re-link external accounts for balance and budget tracking:
Account Dashboard on desktop:
Click ‘Get Started’ button on the View External Accounts widget on the right side of the page (beneath the Savvy Money widget)
Budgeting & Savings Goals widget:
Click the ‘View External Accounts’ tile
In Settings > Accounts:
Click the ‘+ Link External Account hyperlink’
Business
Statements can only be accessed from the Business Primary or Master User’s login. Sub-Users cannot be granted statement access.
To view card rewards, business members will need to register on the card rewards site and set up a separate login to access it.
To register for card rewards access:
From digital banking, click Tools & Services > Card Rewards (or visit https://rewards.elevationscu.com(opens in a new window))
In the upper right corner click "Register" and complete the enrollment process
Members can also contact our Card Rewards vendor for assistance at 844-232-8793
In most cases, business members will not be able to see their business credit card loans or manage cards in the personal login, even when 360 access is enabled. This is due to the individual name types on these loans (Guarantor) not being read for digital banking access.
Members can create wire requests in Transfers & Payments > Wires.
If a sub-user is attempting to access wires from a Small or Micro Business package, that sub-user must have an address in their profile.
Only members in the Medium Business package will be able to schedule wires in advance. All other users will be unable to schedule wires and will have to submit them as needed.
The old platform supported additional history than what is held in Episys. Members will only have access to see the transaction data stored on our core, which goes back 13 months.
In some cases business members are getting an error message ' Unable to Proceed' when they click Order Checks within digital banking.
Business Member that are experiencing this issue have the following workaround options:
Stop by Elevations branch
Call and place order over the phone
Error Message members are being presented
